Soft, fluffy idlis are not hard to make at home. Follow all our tips and recipe to T, you have the best idli recipe ever! South Indian’s cannot live without idlis and making perfect idlis every single time isn’t hard at all!
Idli is MOST POPULAR Indian breakfast that is healthy, nutritious and filling. It’s basically steamed rice cakes made from unique fermented rice and white lentils batter called idli batter.
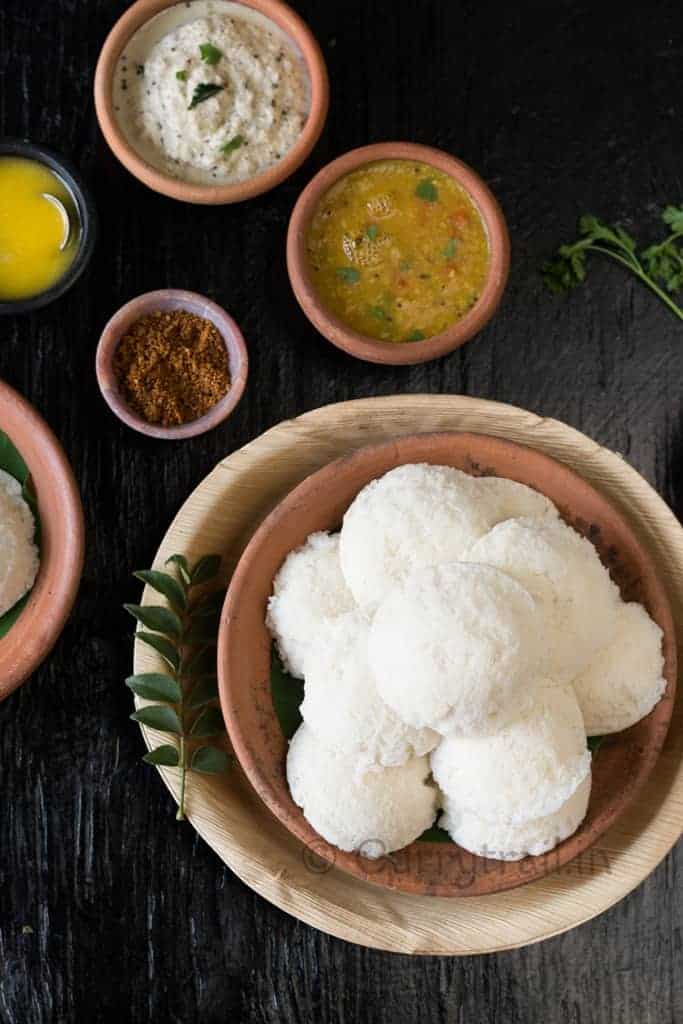
If you are a South Indian, well Indian, you are expected to know how to make idlis at home, the perfect way. Not just any average idli, but soft, fluffy idlis almost like clouds, see the pic above, don’t the idlis look like clouds!?
Making idli at home isn’t really hard. Especially in today’s world when wet grinders are so compact and available to every single house hold. Olden days, idli batter was ground on granite stone grinder by hand.
I still remember the time when mom used to have one of those stone grinders and it was me and my siblings task to grind idli batter batch for the week. Yes I have been making idli batter since my childhood, I was probably 10 years old when I was grinding idli batter on granite stone grinder by hand.
We used to divide it among 2 of us and grind it by hand. Extremely tiring and you can get a stiff neck end of the day. But idlis did turn out PERFECT, every time.
Later came those huge wet grinder which made life easy when it came to making idli batter. But lifting the grinding stone, boy I struggled lifting those stones, but it was convenient compared to hand grinding.
These days, wet grinders are compact and making idli batter doesn’t really feel like a laborious task. You can easily make it at home, even if you haven’t made idli batter before.
Idli is an integral part of our cuisine. At home we make Idli at least 3 to 4 days in a week for breakfast or dinner. I make it so often that I forgot to document it in my blog. A lot of readers and friends asked me about that perfect batter recipe that gives you soft and spongy idlis. I just kept postponing the post for the a very very long time now. For those who asked me, here it is and apologies for delaying it so long.
I NEVER buy idli/dosa batter from outside, unless I have traveled and coming back home from a trip and have to make something quick. That’s the only time I buy batter.
My mom makes this idli/dosa batter at home all the time and I follow the same recipe. The batter comes out perfect and the idlis turn really soft(read tips and tricks mentioned below to get perfect idlis all the time). Once you make these at home, you will agree to me that buying idli batter is such a waste.
I make one common batter from which I make perfect soft spongy idlis and crispy thin dosas. I also make the batter in large quantity which I store refrigerated for a week and use it for different breakfast and dinner. The quantity mentioned would give you batter that can be kept (in fridge) and used for a week.
Tips To Make Perfect Idli Batter Recipe
Wouldn’t you love soft, fluffy idlis every single time? If you said yes, it all depends on idli batter recipe. You make perfect batter to make soft idlis.
- The most important aspect in making idli batter is the rice and urad dal ratio. I always used 4:1.4 ratio. That is, for 4 cups of rice(3 cups idli rice, 1 cup raw rice) I use 1 ¼ cup whole urad dal.
- ALWAYS use whole urad dal while making the batter. The broken ones don’t give you the same results.
- The soaking period of both urad dal and rice should be minimum of 6 hours. A well soaked rice and urad dal will give to nice smooth consistency batter.
- Another key factor for getting those perfect idli or dosa is the fermentation process. Ensure that you keep the batter in naturally warm place for 8 to 10 hours. If the season does not give enough warmth in your kitchen you might have to ferment for much longer time that 10 hours or heat up your oven to the lowest temperature and place the batter inside the oven with oven lights on.
- If your idli rice is red in color, you will get idlis that are slightly reddish. I love my idlis to be nice white in color so I ensure to use only white idli rice.
- I have mentioned the recipe for one batter that can be used for both idli and dosa. While making dosas, make the batter little thin and use it. But do not add water to the batter while using it to make idlis. Idli batter as mentioned above should be thick.
- You will get thin crisp nice browned dosas from the same batter as we added fenugreek seeds in urad dal. So don’t skip that.
CONSIDER TRYING THESE OTHER BREAKFAST RECIPES –
- Chutney Recipe
- Vegetable Idli
- Instant Oats Masala Idli
- Kanchivaram Idli
- Idli Upma
- Semiya Upma
- Instant Rava Vada
- Ven Pongal
LOVE THIS RECIPE? KEEP IN TOUCH AND DON’T MISS OUT ON ANY OF CURRYTRAIL RECIPES! FOLLOW ME ON INSTAGRAM, PINTEREST, and FACEBOOK.
HAVE YOU TRIED ONE OF MY RECIPES? I’D LOVE TO SEE WHAT YOU’VE MADE! TAKE A PICTURE AND USE THE HASHTAG #CURRYTRAIL ON INSTAGRAM SO I CAN SEE! I’LL DO A HAPPY DANCE IF YOU TRY MY RECIPE AND SHARE IT WITH US!
Idli Recipe
Ingredients
For the batter-
- 3 cups idli rice this is not same as raw rice we use in day to day cooking
- 1 cup raw rice normal rice/pachaiarisi
- 1 ¼ cup whole urad dal white color(ulutham paruppu)
- 1 ½ teaspoon fenugreek seeds methi seeds/vendhayam
- Water as required
- Salt to taste
Instructions
- In a bowl add idli rice and raw rice. Rinse them once under water and soak in enough water. In another bowl add whole urad dal and fenugreek seeds. Add water for soaking. Rice and dal have to be soaked separately for minimum 6 hours to maximum 10 hours.
- After soaking period, rinse rice and dal separately 2 to 3 times once again.
- First in a grinder (preferably wet grinder) add urad dal with little water to begin with and grind until it turns smooth and fluffy. This might take somewhere between 30 to 50 minutes based on you grinder and the quantity of the dal used. Add water in very small quantities (about a tablespoon of water each time) in between the grinding time. Also scrap the sides while grinding to ensure all grains of the dal are ground even. One of the key in getting soft idlis is the consistency of urad dal batter. The batter has to be really smooth and fluffy(the volume doubles after grinding)
- Once done, remove the dal into a large bowl and set it aside.
- Next without washing the grinder, add soaked rice and grind it by adding little water at a time until the rice turns into a smooth batter. Remove into the same pan holding urad dal batter.
- With a stainless steel spatula, mix both the batter together. Set it aside for a good 8 to 10 hours for fermentation process. Preferably overnight.
- Next day, you will see the batter doubled it’s volume and raised well on top. With a spatula mix it well, add salt to the batter and mix again. That’s it. The perfect idli/dosa batter is ready.
- The consistency of the batter for idli will have to be thick to get soft spongy idlis. So do not add water to the batter if you plan to make idlis. And if you want to use this batter for dosas, take a portion of the batter required, add very little water mix and check if you got the right pouring consistency, then use the batter in making dosas.
- To make idli in traditional way, I use the aluminum idli pans. And instead of greasing the pan with oil, I use a wet cotton cloth on which I pour the idli batter(thick batter) steam it for 10-12 minutes and then gently remove it from the cloth.
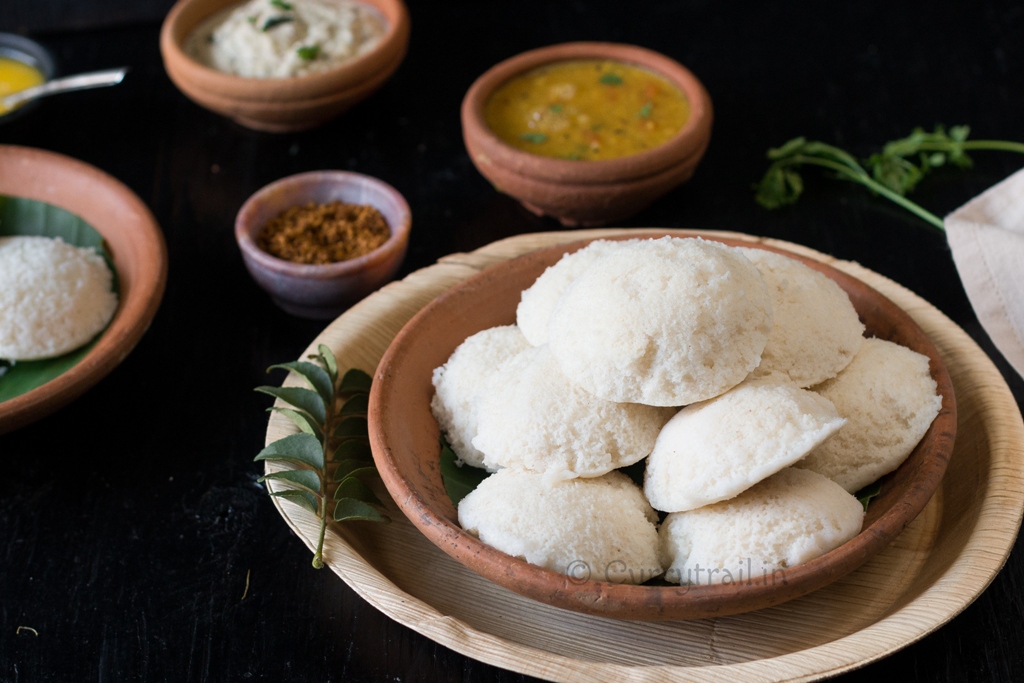
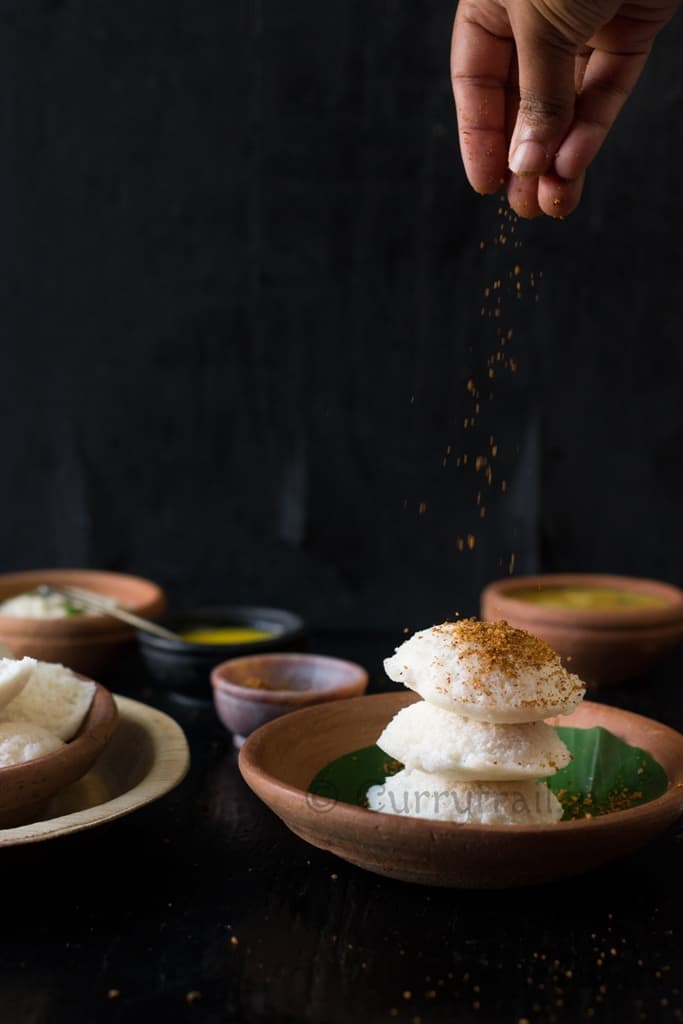
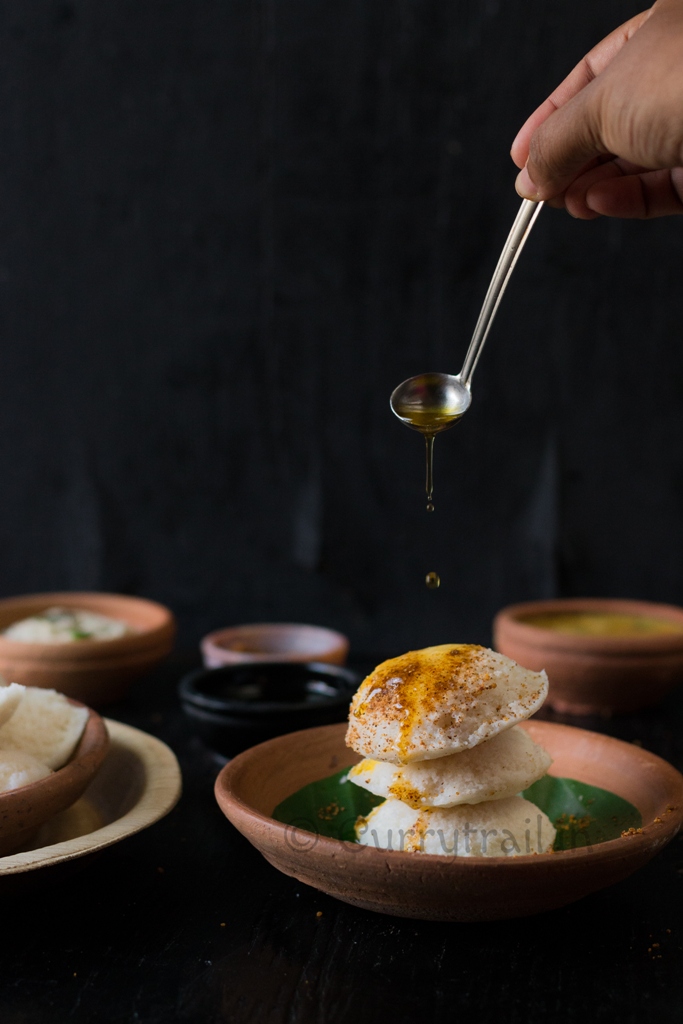
- Idli’s made in these traditional idli steamer pans turns out very fluffy, soft and big. Serve steaming hot fluffy idlis with tiffin sambar, coconut chutney, spicy onion-tomato chutney, mint chutney. Or simply serve idlis with idli podi(idli chutney powder) topped with few drops of warm ghee(clarified butter).
Notes
- The most important aspect in making idli batter is the rice and urad dal ratio. I always used 4:1.4 ratio. That is, for 4 cups of rice(3 cups idli rice, 1 cup raw rice) I use 1 ¼ cup whole urad dal.
- ALWAYS use whole urad dal while making the batter. The broken ones don’t give you the same results.
- The soaking period of both urad dal and rice should be minimum of 6 hours. A well soaked rice and urad dal will give to nice smooth consistency batter.
- Another key factor for getting those perfect idli or dosa is the fermentation process. Ensure that you keep the batter in naturally warm place for 8 to 10 hours. If the season does not give enough warmth in your kitchen you might have to ferment for much longer time that 10 hours or heat up your oven to the lowest temperature and place the batter inside the oven with oven lights on.
- If your idli rice is red in color, you will get idlis that are slightly reddish. I love my idlis to be nice white in color so I ensure to use only white idli rice.
- I have mentioned the recipe for one common batter that can be used for both idli and dosa. While making dosas, make the batter little thin and use it. But do not add water to the batter while using it to make idlis. Idli batter as mentioned above should be thick.
- You will get thin crisp nice browned dosas from the same batter as we added fenugreek seeds in urad dal. So don’t skip that.


Comments & Reviews
Nimisha says
Hi Jyothi..
Many thanks for sharing the receipie.. I love idli. Tried making many times but din come out well at all.
In ur receipie, you have used idli rice. I am based out of Kolkata. Where can I get idli rice here and how is it different from normal rice.
Many thanks for your patience and help.
jyothirajesh says
Nimisha I am not sure where idli rice would be available in Kolkata. You can try online stores like bigbasket, naturesbasket
Shilpa says
Hi Jyoti,
Thanks for this wonderful recipe.Everytime I’ve tried making Idlis at home,has never worked,rather never fermented(kept the batter in the oven as well with lights on),don’t know what goes wrong,will give it one more shot with ure recipe.
Can U tell me which brand of idli rice shud i get(want to get it right this time),so asking the minutest detail….again thx a lot for this!
jyothirajesh says
Hey Shilpa,
I do not buy any branded idli rice, I buy it loose from the rice trader guys. Regarding fermentation, if it’s rainy or winter season, fermentation will take longer time. So try to keep it say even for 16 to 18 hours even if you have to. Just check if batter is risen to top and is almost doubled the volume at the end of fermentation process.
Revathi says
The idlis look so soft and spongy. The amazing pics have elevated the humble idli to the next level 🙂
jyothirajesh says
Thank you Revathi. You lovely comment made my day 🙂
Rakhi says
do you add soda-bicarbonate in the fermented batter before making idly’s ?
jyothirajesh says
Rakhi – no I never add sodium bi carbonate to batter. But I know some people add it to batter after fermentation and you can definitely add it too. Personally I never add it to my batter
Revathi says
I have heard that adding sodium bi carbonate usually makes your idli look more white n bright. For this reason, it is always used when making idli in Hotels. However, since it is not very good for your tummy, most of the households avoid it.
jyothirajesh says
You are absolutely right Revathi, adding soda makes idlis more soft and spongy. But i mostly avoid it, in winters when fermentation does not happen I use soda. but other wise I avoid it to as much as I could.
Rakhi says
That’s awesome, thanks! will have to try… My problem is they don’t turn out soft if I don’t add soda but will try your recipe next time 🙂
jyothirajesh says
Thank you Rakhi. Do try it out. If the fermentation happens right, then the idlis will turn soft with out the soda. You can add soad if you think the fermentation was not enough
Remya says
Thanks for the recipe Jyothi. Any particular raw rice brand to be used ? Wud any of sona masuri or indrayani do ?
jyothirajesh says
Hi Ramya, you can use any brand of raw rice. I ave use sona masoori and kolam rice and they both give same results, perfect idlis.
Shailaja says
Well said about motherhood jyothi…its really a sweet experience.. nice clicks jyothi
jyothirajesh says
Thank you Shailaja. We all mothers would have almost the same experience 😀
Sathya @Mykitchenodyssey says
I got you jyothi .2 hands and 2 legs full …Wonderful tips and tricks dear .Lovely shots as well.loved the oil shot so much
jyothirajesh says
Seriously Sathya, I some times feel I should have been an octopus, with 8 limbs and I could have done some much work 😀 😛
Thank you for your sweet comment 🙂